The carving of Scandinavian sculptures of Madonnas and Saints made of oak wood, from the 13th century
Communicating with the old masters through their works
ABSTRACT
The secrets of the carved medieval wooden sculptures reveal themselves slowly but sure as one tries to revive the artisan’s way of thinking. The aim of this study is reconstructing their work, exploring the processes involved, practically step by step, the interaction between the materials, the tools and the artistic mind, and how they all contribute to the final result, become clear.
When you stand there facing a huge log, with bark and bumps, weighing hundreds of kilos, and are about to create the most delicate Madonna enthroned, in wavery garments with a baby boy on her lap, where do you start? What is the first tool you bring out, and what is the second? The answers come along the way as the work proceeds.
By undergoing the processes as close to the original way as imaginable, figure out the shape of the tools and read the tool marks on the originals. Experimenting with the way of using them and explore historical illustrations. Examine the medieval pieces of wood and search the forests for trees with similar qualities. Execute the work with presumably the same momentum, and let the craftsman, the tools and the materials play harmonically together.
of the log as a «golden» standard for all the other proportions in the work?
- Can stylistic phenomena, praised by art historians, as gothic finesse, be mere coincidences caused by warping of green wood?
- And are mysterious irregularities in the compositions just a result of the heavy weight of a big oak trunk?
Trying to recreate the processes behind these works of art gives new perspectives, as to how to perceive and understand them, and also, how to preserve them. Not only as historical objects, but also as works of art.
The Sources for this work are the original sculptures still preserved from 13th century Scandinavia.
Keywords:
Medieval wooden sculptures, reconstructing, woodcarving, medieval art.
INTRODUCTION
This study has sprung out of practical work with reconstructions of 13th century church art, assigned by congregations and museums in Norway over the last 20 years. A lot of the sculptures from the period are being stored in museums for preservation purposes, and need to be kept this way, whereas the public wants to have the chance to adorn them, and the art pieces are important for the feeling of local identity and pride. The old art pieces still play a role for people of today. A solution to the problem has been to make reconstructions that can replace the originals in situ. When such projects are about to be undertaken, committees of scholars from the museums set up strict regulations on how the work should be executed to assure the authenticity of the reconstructions. The emphasize has been on the surfaces, on what meets the eyes of the spectators, the polychromy, the last touch on the vast work of making a sculpture the medieval way. Primarily because that has been the focus of the scholars traditionally, the art historians and the conservators.
But can a visual surface really be understood without knowing what lies behind and underneath it? The frontiers of art history are being pushed forward as we dig deeper in the material. It is here I hope I can assist with a humble contribution.
This article aims to give a short presentation of knowledge and discoveries that have been unveiled through the practical work I have been doing as a woodcarver, striving to make these reconstructions as authentic as possible. Mapping out the strategies and the way of thinking, I believe the artisans of the 13th century had and used. Carefully studying the originals, and experimenting with techniques, and letting the materials and the tools lead the way. A main guideline for me as a craftsman is to find rational ways and solutions for creating objects, even in the most intricate works. Because time is always a factor, and the essence of crafts seems to be, rational ways to reach the goals.
Can the entire composition of the intricate sculptures be measured out by using the width of the log as a «golden» standard for all the other proportions in the work?
Can stylistic phenomena, praised by art historians, as gothic finesse, be mere coincidences caused by warping of green wood?
And are mysterious irregularities in the compositions just a result of the heavy weight of a big oak trunk?
This paper will hopefully shed light on these, and other questions still discussed in art history.
Everything being presented here is based on personal observations and experiences through this work as a craftsman, and due to the lack of comparable projects, is not referring to theoretical or practical work done by others. The sources for this work are the surviving sculptures of 13th century Scandinavia.
The photographs are with a few exceptions all taken by the author and illustrate the practical work in the workshop over the last years. Figure 15 shows an early 16th century woodcut by Hans Burgmail, published by Hans Huth in “Künstler und Werkstatt der Spätgotik” 1925. Figure 16 shows decorations on a 13th century choir stall published by Martin Blindheim in “Painted wooden sculpture in Norway c.1100-1250” 1998.
In the 13th century, the gothic style with its ideals found its form. In the three-dimensional sculptures we can see how the artisans conscientiously created shapes and surfaces intended to catch the light and play with it. Soft rounded shapes and sharp edges, bottomless dark depths, side by side with reflecting highlights. Silk is rustling, and soft velvet and fur lies heavy over bodies. Metals polish shine in all shades, and pale skin is blushing pleasingly.
The art from this epoque is not more mysterious than any other art from the past. However, if one wants to understand it, and really appreciate the efforts put into the work, see the intentions and the ideas that lays behind each piece, a good way is to follow in the footpaths of the masters. Study and interpret the art pieces that still exist and try to do the same.
Materials and toolmarks tell about the processes, as the work goes along. By examining the statues preserved and working with reconstructing and copying techniques thoroughly by using contemporary tools and materials, patterns in the process of making those sculptures reveal themselves. Patterns, which are an important key to understanding the artisans’ goals.
THE BEGINNING
When you are out in the woods looking up at the big oak trees, stretching straight, with their mighty trunks towards the big tree crowns, you may start to wonder: Here are metres upon metres of the most delightful material. Compliant wood, which easily can be carved into any shape with the right tools, yet it seems that the pieces of wood often used for the sculptures discussed here, are the ones from up in the tree crowns. Here the branches grow out from the stem, wood fibres sprout out in all directions and the wood is full of tensions. Not always, pieces like this were chosen for carving, but quite often (Figure 1). One would think that when something so grand as a Madonna enthroned was to be made, covered in so much gold, and painted with the most valuable pigments imaginable, before being adorned and worshipped by the thousands, only the best of resources would be good enough. Nevertheless, it does not seem to have been the case. An oak tree was, and still is, a tremendously costly natural resource, and the way to harvest it, clearly following some kind of craft hierarchy. Perhaps the shipwright and the engineer got their pieces first, and then other craftsmen and artisans got the rest. This tells us something about how the woodwork on these sculptures was reckoned, not in terms of being inferior, but more as being the invisible base that a piece of art was about to be created upon.
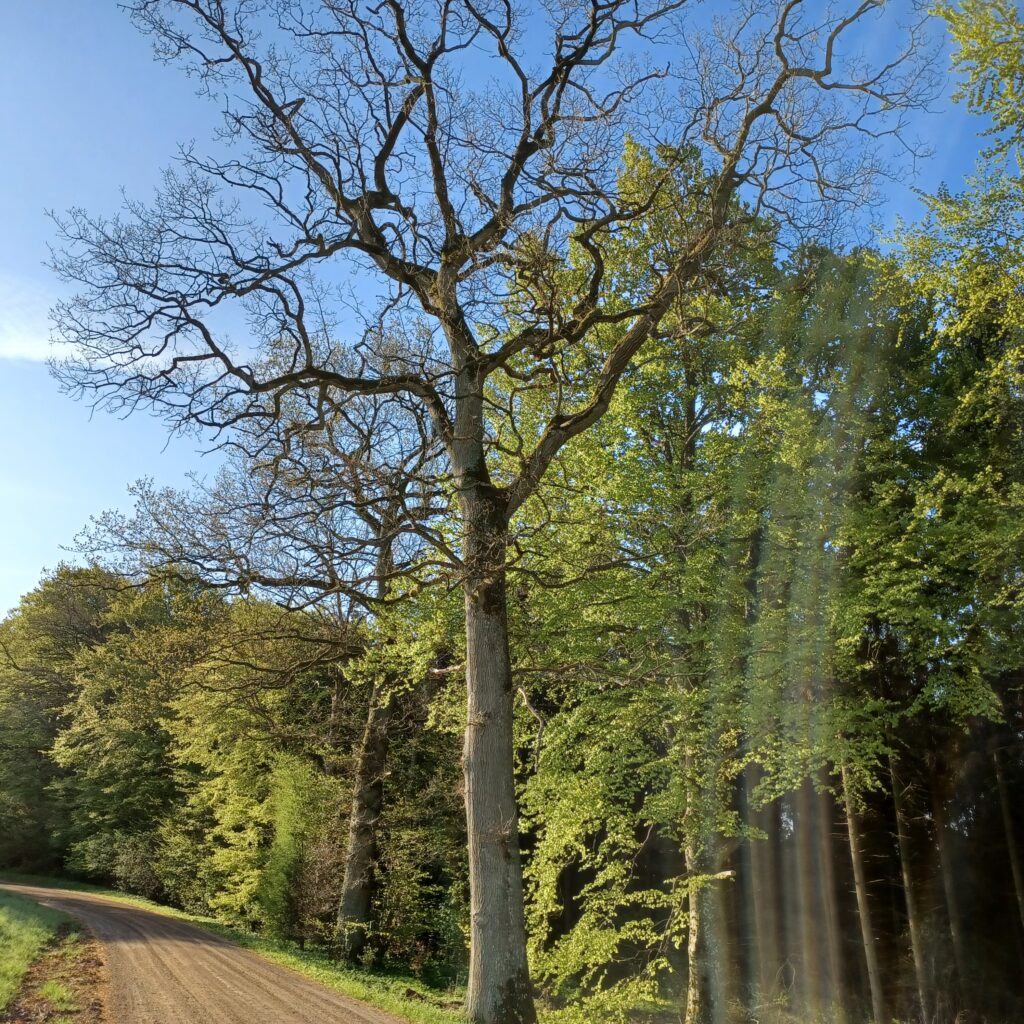
FIGURE 1. Oak tree in Eriksdalen, Scania.
Whether the sculptures were intended to be displayed in altars and shrines, mounted on the wall, or as part of calvary groups over a choir, they were always meant to be viewed from a frontal aspect. They are not sculpted in the round, and all their features are adjusted as to be seen from a lower perspective. Quite often they are shallow, – deep reliefs-, rather than three dimensional sculptures (Figure 2). Yet the efforts to create a sense of depth and volume is impressive. Thighs and forearms are shortened, so the figures can «fit» into the pieces of wood. The bases are tilted steeply downwards towards the spectators, who will then see the upper side of the shoes, rather than the soles, the same with the cushion on the seat of the throne. The torsos are lengthened, and their heads sometimes almost bowed, to meet the eyes of the viewers. The whole composition is subjected to a specific point of view, and so are all the technical solutions the artisan would have to undertake during the creative process.
A frontal sculpture never intended to be viewed from the back, is a sculpture perfectly suited for being made of wood.

FIGURE 2. Reconstructing the Madonna from Balke. Monumental and majestic, yet the wood piece she is carved from is not more than 17 cm deep.
THE TREE TRUNK
Oak is very dense, and an extremely solid and durable kind of wood. The wood is full of tannic acid, keeping insects and microorganisms away, and the structure of the wood is strong. That makes it difficult to work. However, it also has its weak spots, and easily splits along its medullary rays. While still fresh, it is considerably more compliant, than when seasoned. The sculptures in question were made from green wood and almost without exceptions from logs split in halves. Therefore, a single piece of a tree trunk would become two statues.
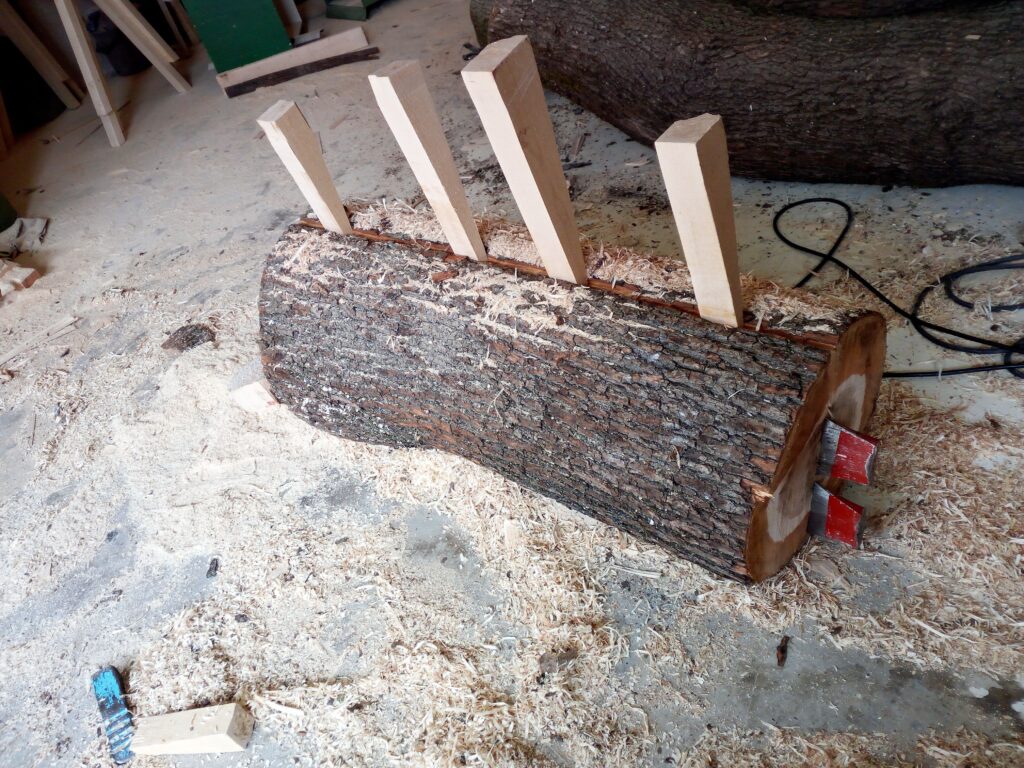
FIGURE 3. Splitting the log in half.
A COMPASS OR SOME OTHER MEASURING TOOL
When the trunk is split in two, and lays before you, big heavy and rough, maybe 150 kilograms of troublesome oak, how do you find the delicate Madonna with baby Jesus on her lap hidden inside? Where do you start?
When studying the originals, it seems there are some key proportions relating to each other, some ratios are frequently appearing, and at the same time one can read from the wood pieces that the artisan wanted to use the whole potential of the piece. That means that the size of the sculpture was not planned before the piece of wood was ready, and probably not even relevant. The log split in halves, dictated the size and shape. And it is the width of the piece that determines the design. This measurement is the key number one needs for all the other measurements unveiling the beings inside the log (Figure 4).

FIGURE 4. Crucifixes from “The Tyringe group”. Historical Museum at the University of Lund. 14th century. Oak. Clearly from the same workshop. They come in any sizes, but bear all the same features and proportions, with no more than irregularities of the wood piece, dictating different solutions in the details.
Making a square with the width of the log gives you the throne that the Madonna or any other Saint is seated upon. You then mark that with the axe, on both sides of the piece. Roughly chopping, either standing on the piece of wood, or moving around it. That is the start, now the carving begins. These markings – the key measures – will be there as guidelines through the whole process, and if they turned out a bit different on the two sides, well, what is done is done (Fig.5).
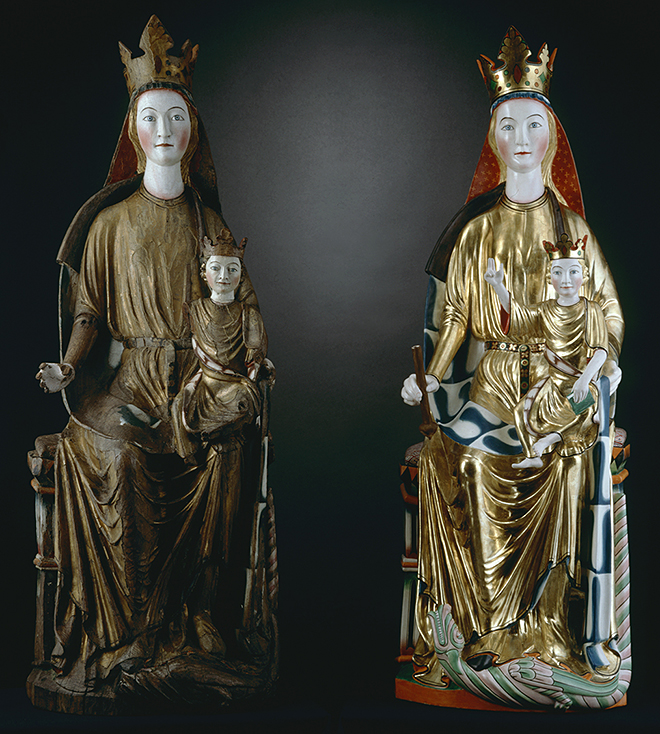
FIGURE 5. The reconstruction of the Madonna from Hedalen is sitting on a throne with completely different height on the two sides. How could such a skilled artisan make an error like that? It is all about the process, and of what the wood dictates. Photograph: Historical Museum, University Museum of Oslo, Norway.
The measurement of the width then gives you the height of the Madonna’s knees, and if you double it, you will find her chin. Mark these with the axe. Then divide the key measurement by two, mark the vertical middle section the size and one-half, and the two side sections the other half.
These lines give you the Madonna’s left cheek and Baby Jesus ‘right cheek, along with Marias kneecaps. All the extremities of the sculpture are being marked.
Along the centre line of the figure, is where Jesus’ outstretched arm will have to be jointed on, since the medullary rays of the oak wood interfere with the wood’s strength here.
And thus, by using the key measurement, either as it is, or divided by two, three or four, all the extremities of the figure are laid out, and then the work with the negative spaces begin (Figure 6 – 10).
A similar way of measuring can be detected from the side views of the sculptures as well, then with the depth of the wood piece as the «key number».
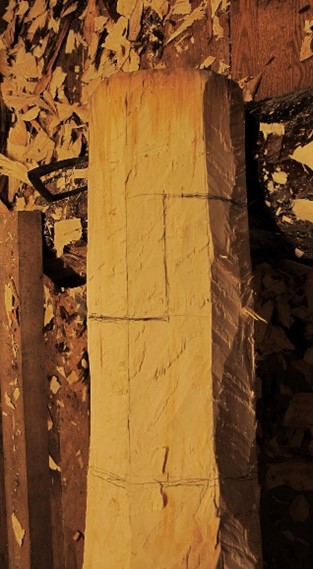
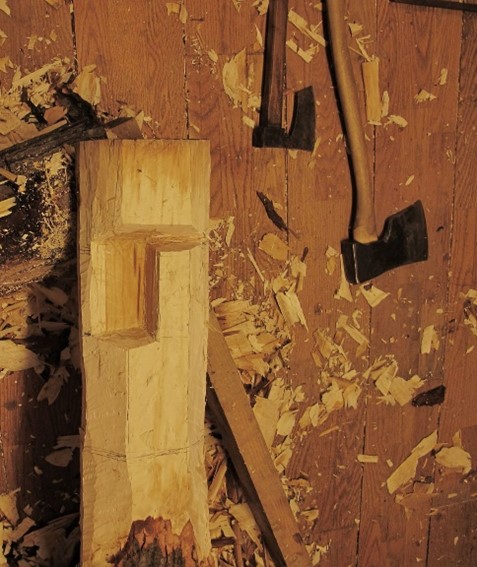
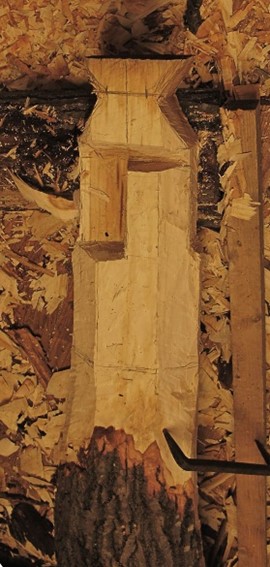
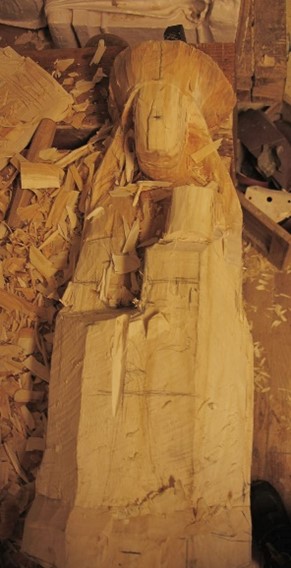
FIGURE 6, 7, 8 AND 9. Testing the theory before starting on the full-scale copy.

FIGURE 10. The model is finished, before carving the 1:1 copy.
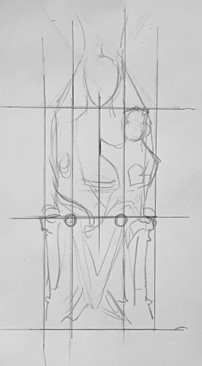
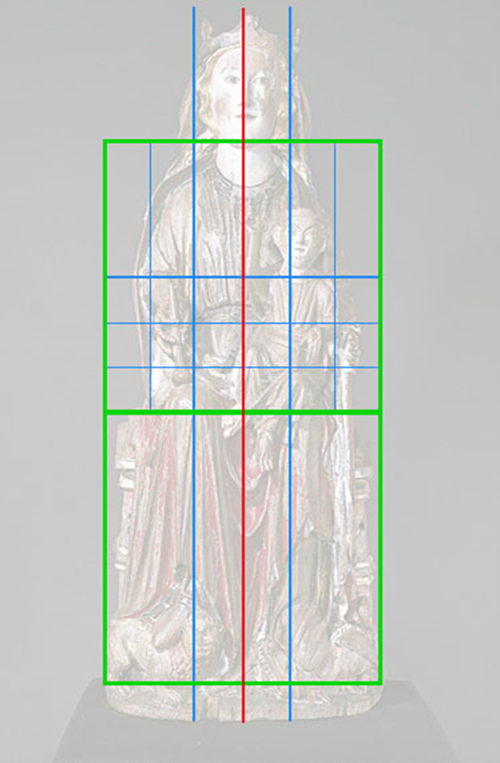
FIGURE 11 AND 12. Sketch showing how to “construct” a 13th century Madonna (Figure 11). The “construction grid” placed over a photo of the Madonna from Biri (Figure 12).
TAMING THE WOOD
Hollowing out
When a tree trunk is seasoned, from green wood to dry wood, tensions are released, and the shape changes. The wood will shrink as the water inside the structure evaporates. Cracks appear where the wood is weakest, usually where the distance from the core to the bark is the shortest, like the weakest link of a chain. When the log is split in two halves, much of this problem is solved, as the wood now can contract along the split surface, instead of cracking up. However, the drying process works from the outside and inwards and the different areas in the wood structure reacts differently in the drying process. With just a limited number of exceptions, the back of the sculptures was completely hollowed out following the form of the sculpture, excluding the head (Figure 13).
Hollowing out the split or backside, helps reducing the tensions. By diminishing the thickness of the wood, as far as possible, and often too far, the sculpture in the end becomes merely a thin shell, almost as a canvas for a painting. Very often, we can see that the carver has carved through the sculpture, penetrating the surface, leaving holes in the deepest cavities, and between the big draperies. It happened so frequently that we can assume it was not considered a problem, otherwise they would have come up with solutions to avoid it from happening. Later in the process these perforated areas were patched up with linen clothes, canvas or other, which would also be the remedy for knots, cracks and different irregularities.
Perhaps roughing and hollowing out blanks, was an assignment for apprentices, so they would be ready, for whenever they were needed.
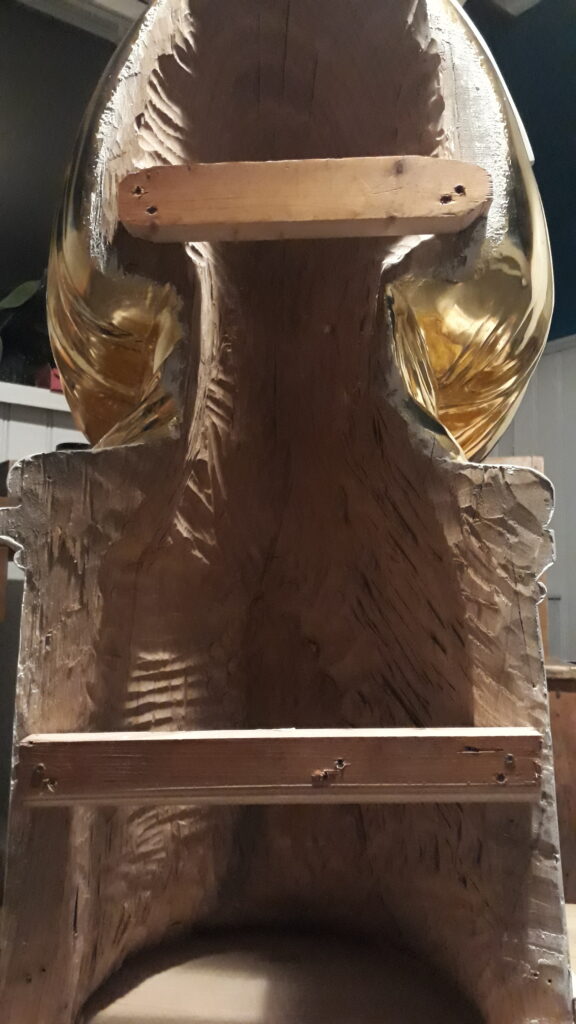
FIGURE 13. The reverse of the copy of the Madonna from Hove. Here the different stages of the work show clearly. From the roughest initiating hewing, to the delicately polychromed final surfaces. (The horizontal planks are temporary attached for handling the sculpture without touching the finished surfaces.)
The hole in the heads
What all of these statues have in common, is a drilled hole in the middle of their head (Figure 14). Depictions of late medieval woodcarvers show the artisans using specialized workbenches for carving statues, where the fixing of the work piece in the bench, is with a peg in the head, and some other fixing device underneath the base of the sculpture (Figure 15). Still, that is not necessarily the purpose of the hole in the head. By drilling a hole in the head, which is the thickest and most massive part of the whole sculpture at this point, the thickness of the material is halved by drilling a hole in the middle of it, and the evaporation of the wood’s moisture will work from both the outside of the head, and from the inside, of the hole. Hence, unwanted cracking can be controlled. The late medieval depictions of the sculptors working show statues with massive bases, but the saints of the 13th century do not have massive bases where a hole can be placed or iron spikes. The way of working when making a frontal statue, is very different from the way you think when doing a sculpture in the round. It is likely that the process of working these sculptures was executed like this: The vital measurements were marked, and the different widths and depths were roughed out. Thereby all the elements were given their spatial positions in the piece of wood – the anatomy of the figures, the architectural elements, the shape of the big draperies. To be followed by the hollowing out. Resultantly the wood is tamed, and the carving of the details can begin.
The contraction of the wood, while drying out, makes the flat backside curl towards the front. The sides of the piece, which often would have been hewed in a 90-degree angle to the flat backside, will start to lean forwards, and may be the explanation for the “reversed perspective” often considered to be a gothic finesse.
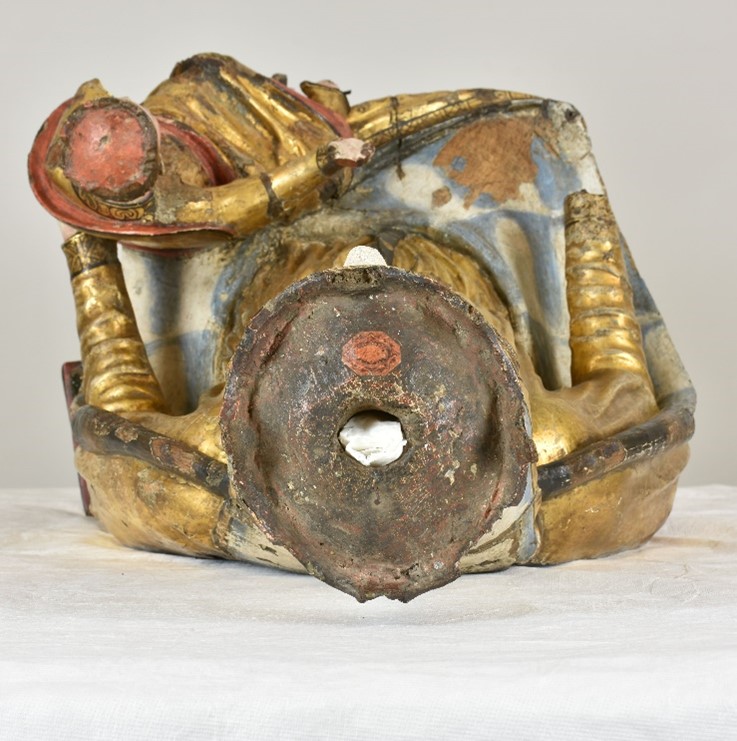
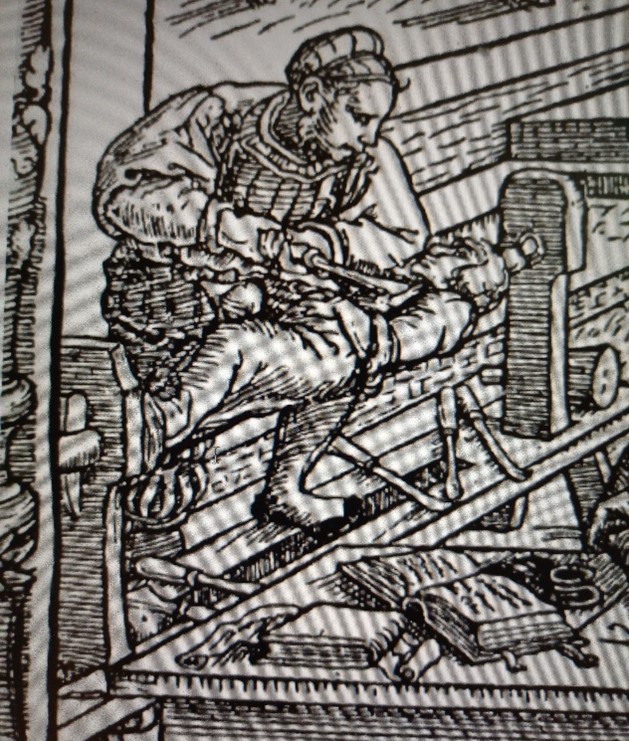
FIGURE 14 AND 15. The Madonna from Hove seen from above (Figure 14). Photograph: Historical Museum, University Museum of Bergen, Norway. Illustration of a 15th century workbench (Figure 15).
WOODEN SURFACES
Most of the preserved statues from this period have lost most of their polychromy throughout history, what gives us the opportunity to study the qualities of the wooden surfaces. These surfaces were never meant to be seen, only functioning as the foundation for the grounding, which would give the sculptures their final shape, and for the polychromy, adding textures, effects and life. What we see is a wide variety of qualities on the wooden surfaces from the most delicately carved details to extremely rough and unfinished areas. Obviously, shapes, and not surfaces, were in focus. One can easily be led to believe that the statues of the highest artistic quality, are the ones with the smoothest finish, and that the mediocre pieces are cruder, but that is not the case. Some of the gothic statues that still have a well-preserved polychromy, show us in the few places where the ground layer is missing, the rougher the finish of the woodwork is, the better adhesion for the grounding.
TOOL MARKS
Tools for woodworking often leave traces and tool marks. Traces that can be interpreted and tell us about the shape of the tools, their size, and how they were used. The carpenter, with pride leaves his toolmarks, marks that show us his abilities and good techniques. The case is not the same for the woodcarver. The woodcarver is striving to make wood become something other than wood. His goal is to turn wood into convincingly looking skin, hair, textiles and metals, and his pride lies in not leaving revealing traces of tools. There are quite a few depictions of woodcarvers at work, from the medieval period, even depictions made by woodcarvers themselves, and there are good reasons to believe that these depictions are accurate, when it comes to the shapes of the tools, working positions and such (Figure 16). Nuances like the angle of the edge, the sharpening methods, and properties of the steel, can better be understood by experimenting with tools made to look like the old ones in the illustrations.
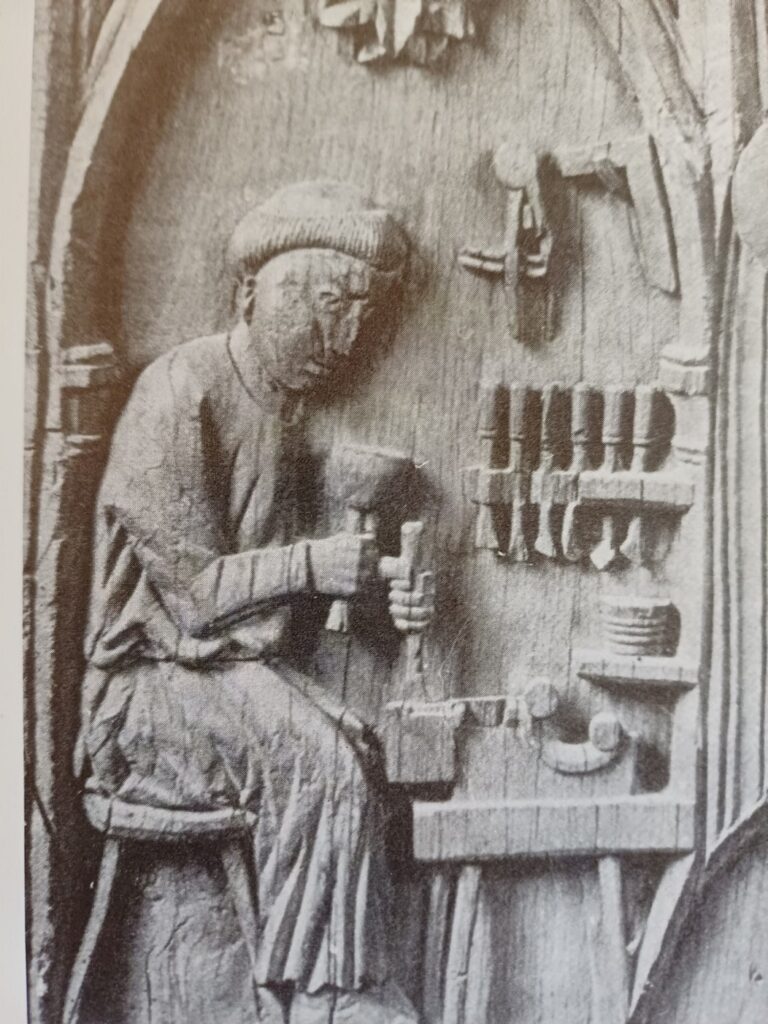
FIGURE 16. Medieval carpenter/woodcarver at work. Decorations on a choir stall originally from the cloister in Pöhlde, Germany, dated around 1280. Nowadays Niedersächsisches Landesmuseum in Hannover, Germany.
THE SCULPTOR’S TOOLBOX – THE DEVIL IS IN THE DETAILS
Since the beginning of time, humans have used axes, knives and other carving tools, and is not an axe just an axe, and a knife just a knife? The purpose of the tool is the same whether it is made of stone, bone or metal, but tiny inequalities in the shape of the tools, will give them surprisingly different properties. The techniques used for sharpening and honing a tool can determine how the tool will work. The steep and straight bevels of today’s modern tools, produced on rotating grindstones, function differently from bevels hammered out in a forge, and honed, maybe for hours, on a flat stone. Carving tools are not specialized for just doing one thing, like a saw that only is meant for cutting either along or across the grains. The carving tool must work in any direction, on constantly changing shapes and surfaces.
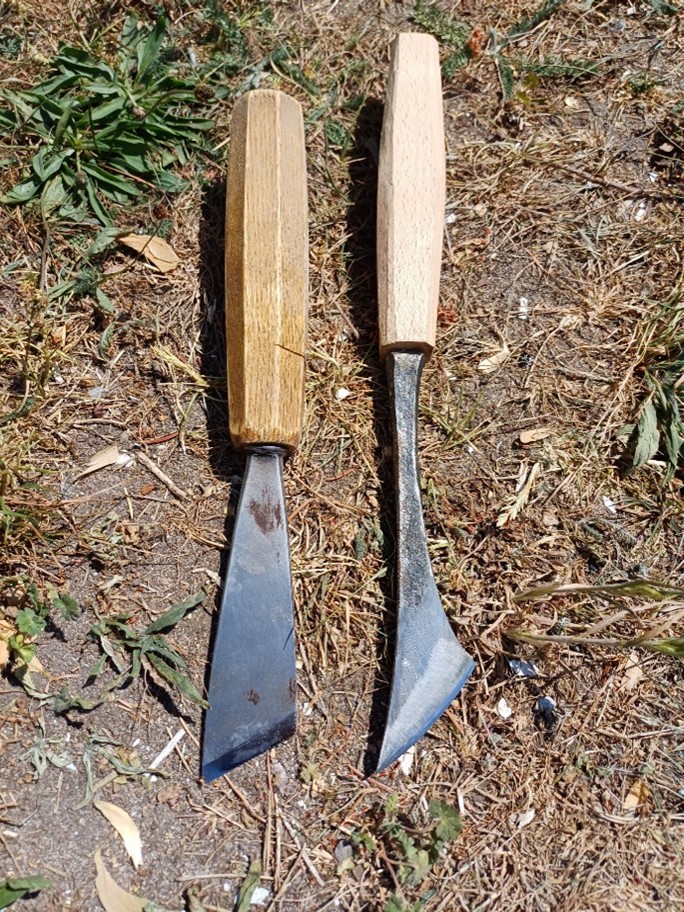
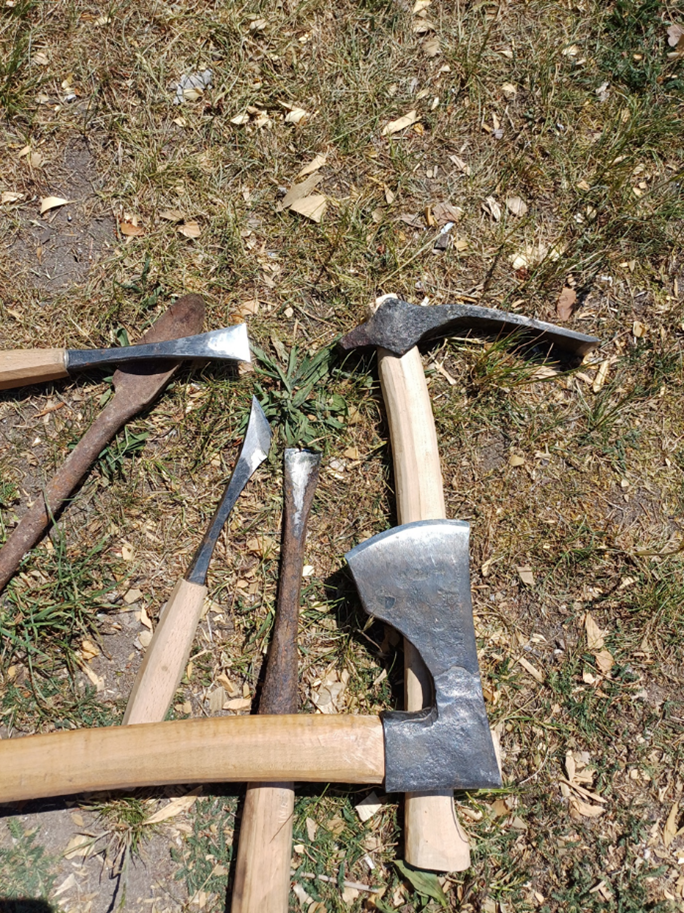
FIGURE 17 AND 18. Modern and “ancient” skew chisels. The first sharpened on a rotating grindstone, the other honed on a flat stone (Figure 17). Auger, chisels, gauge, adze and an axe (Figure 18).
Straight and skew chisels (Fig. 17) seem to have had an obvious place in the 13th century woodcarver’s toolchest, along with the axe, the adze and maybe a couple of gouges and an auger (Fig.18). That makes seven tools. Would that really suffice, for making a Madonna statue, with all its intricate shapes and details? The answer is: More than enough. One can easily skip four or five of them, and still produce such a sculpture effectively. The one you do not want to skip is the skewed chisel. That is a tool that can reach the smallest, deepest and narrowest areas, the thin lines making the wavy hair, the eyelids, the draped garments underneath the cloak’s heavy folds, and the steepest cavities. Also, for moulding the convex shapes, it is very useful. The line of the edge on this tool is not straight, it has a slight curve, and the bevels should be nicely rounded, just like an axe. It is sort of a small axe-on-a-stick, and it ought to be used like an axe as well. Chipping fibres sideways, making constantly changing shapes, as we can see them in the drapes of the gothic sculptures. Marks from the auger is only to be seen in the holes in the statue’s heads, but the holes are always there, so that tool cannot be left out. The auger is also handy when carving the Madonna’s left arm loose from her body, -the arm holding baby Jesus-, but this operation can also be done with the chisels, or a gauge. There are no definite tool marks from gauges anywhere on these statues, as far as I know, but other carvings from the same period, of more ornamental character, suggest that they, at least were in use in those days. However, as mentioned above, the woodcarver takes pride in not leaving revealing traces from tools.
COMPREHENDING THE STYLE – IMITATING NATURE
Understanding how carved shapes and surfaces eventually will appear, after all the preparation layers, paint, gold, etc have been added, is one of the biggest challenges when making these statues. After the woodwork is finished, the entire surface would be covered up with pieces of cloth, sometimes even metal sheets, over the troublesome spots, and then layers upon layers of chalk grounding would be applied – a foundation that once again would be scraped, carved and polished into the final form. The shapes that fabric forms, when laying upon body parts, and hanging loosely down by gravity, and the physical qualities of the different textiles, are complex. Wool is distinctly different from silk, fur from leather and so on (Fig 19).
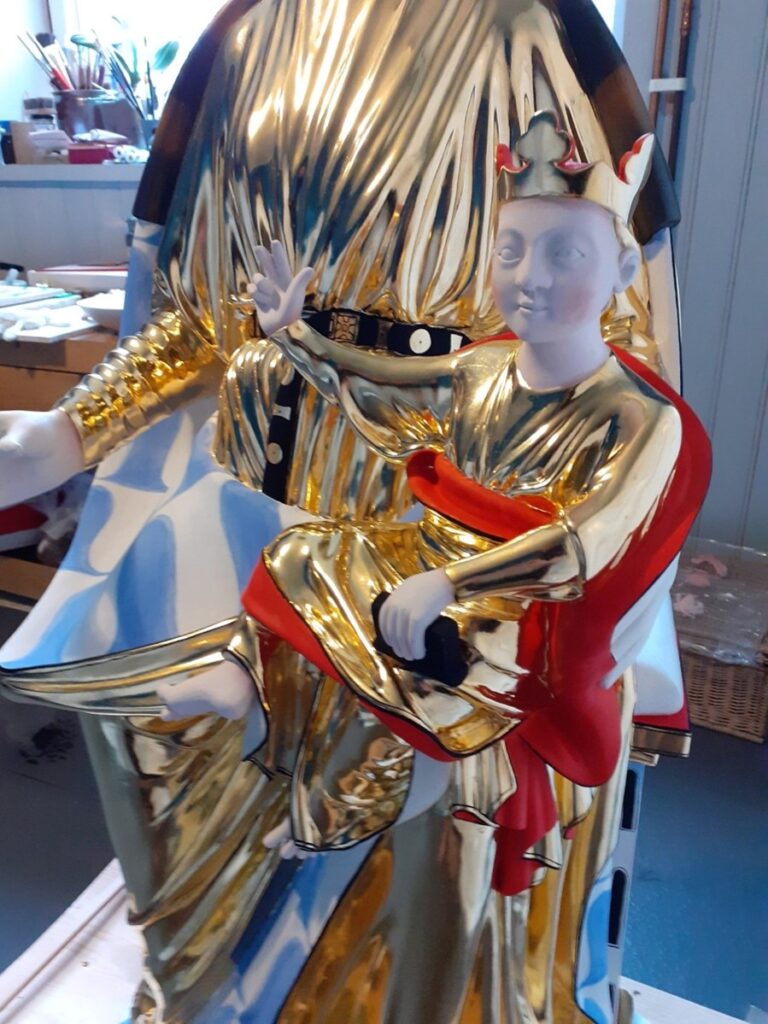
FIGURE 19. Work in progress at the Hove Madonna.
It seems that the deep areas of the statues are the key to understand how the statues were meant to be perceived, and what the artisans were trying to achieve, in their works. Along with other features like postures, thin limbed bodies and graceful pretty faces, the way of treating mass and empty space equally in a three-dimensional sculpture is essential for the artistic ideal and style of the period. The garments draping the bodies are both applied in a way that they gently and delicately hint of the anatomy underneath, and also create volume, by falling with razor sharp outlines down and inwards, into the abysses where the textiles are hanging freely, revealing their own qualities. So much effort and love were put into modelling fine details. For instance, the muscle of the calf protruding, and showing through the garment, since the foot is turned outwards to the side. It is so subtle, almost inviting us to touch and feel, to realize it is there. And then, the fabric hanging freely next to it, covering nothing but empty space. But most of all it’s a theatrical play with light and reflections. The swift alternation between the outwards bulging convex shapes, and the deep concaves, and everything in between, as the surface goes from the one to the other, gives light the opportunity to play with all its wide nuances. From pitch dark to the shiniest highlight. Then add highly polished reflection to the equation, and Voila! You have created life out of dead matter (Fig. 20-22). Far from all artisans working in this style, managed to create these effects successfully, but it was clearly what they were trying to achieve, it was the ideal of the style.

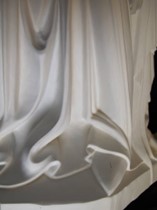
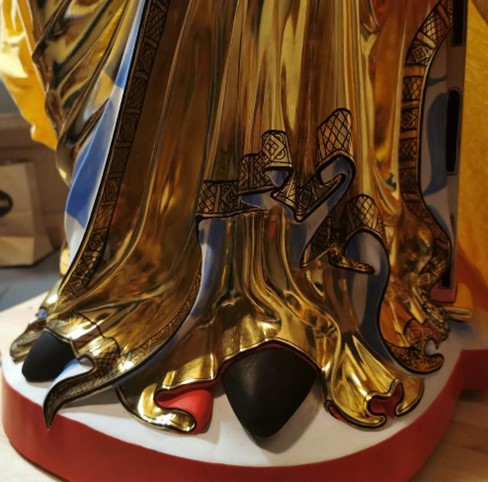
FIGURE 20, 21 AND 22. Three stages of completion. The wood surface, the foundation, and the polychromed finish.
DISCUSSION
Other solutions have been tried out to make reconstructions to place in the churches. For instance, digital scanning of the original as a ground for a cnc-milling machine that carve a precise replica down to the smallest millimetre. (The Birimadonna project). The result can turn out, at least theoretically, to be an exact copy visually of the sculpture in question. At least if the copy is made from something other than oak. And with today’s technology a reconstruction can be 3d printed as well, easily in any material. The advantage of such a copy, rather than a processual made one, is the three-dimensional precision of the surface. But the question is if there is more to a sculpture like this than what meets the eye? The milling machine will not understand the anatomy of the piece of wood and know how to follow the process of the seasoning the wood has to undergo. The result will be that the form alters shape. Therefore, a plastic version would be preferable, if the precision is the goal. But is this really more than a three-D photograph? What you lose choosing such a solution, is the chance to examine the piece of art thoroughly, and all the valuable information that can be harvested while working with the same process as the original.
Both the Viking ship museum in Roskilde, Denmark, and the Oseberg foundation in Tønsberg, Norway, have the last years worked ambitiously making reconstructions of the archaeological remains of the boats found from the Viking age, as historically correct as possible, to increase the understanding of these ancient vessels.
The closer they get to the properties of the materials used, the proportions of all the parts, and the processes of building involved, the more refined the qualities of the vessels become. Experiments with the boats at sea, show their manoeuvrability and seaworthiness, and new and important knowledge are brought to light. The necessity of building a boat properly is of course more obvious than the need for making a piece of art right, if done wrong the boat will sink and people will die, still the nuances in techniques are important to really understand art expressions. And without being able to picture the whole process in one’s mind, important details in the expression, and in the story which is being told, can easily be overlooked or not understood. Although the approach is the same, whether you reconstruct boats or sculptures, examining the originals, using the same tools, imitating the work progress and so on, the element of art will always be there as a joker, when it comes to artworks. Boatbuilding is full of aesthetic choices to be made, as the construction goes along, but sculptures are about make believe, imitations and deceiving. Convincingly making one thing into something other than it really is. A building, or a boat has a practical purpose, the decisions for the solutions during the construction, are taken of practical reasons in a higher degree. The choices made by the sculptor follow a different pattern. Therefore, it is important to map out as far as possible what features that are consciously shaped and not accidently formed by the process. Now, the advantage the researchers recreating Viking ships have, is that they can test their hypothesises physically, and get fairly concrete verifications of them. The same is not the case in the field of recreating ancient sculptures. Nevertheless, the research on how these sculptures were made can be, and hopefully are, valuable for the work done by others, as for example historians, art historians and the conservators, preserving the originals.
Realizing when one’s own experience is crucial for understanding something or not, is often hard to detect, even harder is it to see the distinction between the practical experience given by thousands of hours of work, and the more theoretical knowledge learned from others. Are the two even possible to separate? The aim for my work is first and foremost to preform and create reconstructions as good as possible for the customers, the accumulated knowledge is just a bonus, and not scientific work itself. The big advantage of learning by doing, is that the skills and knowhow set in your whole being, it grows into you somewhere between the eyes and the brain, your joints and muscles, and becomes part of you. The drawback is of course that it cannot be transferred or communicated to others easily. Again, working with a craft for years, and picking up skills, solving puzzles over time, gives knowledge you never can obtain in a limited research project. Whether this kind of research can be replicated and be done by others, depends on where you aim at.
The alternation between studying originals and working practically is of great importance. The hints you get, and the theories you form when studying the original material, need to be tested and corrected by the hands-on work. And the eventualities happening in the work processes, caused by materials warping, tools leaving traces, or other unforeseen incidents, must be checked against the old sculptures.
Assuming that rational solutions were as important for the medieval artisans as it is for us now, seems like a good working hypothesis, since rational work appears to be the core of craft itself. But then again economic thinking can swiftly blur the picture. Can inferior materials have given a profit even if it meant more work, since materials would have been more expensive than hours of labour?
Any opportunity to study old crafts, can give us information about the use of materials, techniques and processes that people before us knew of, which will be of great value to us, now and in the future.
CONCLUSION
Creating a gothic statue of a saint from wood, with a complete polychromy, is a big task. Not only is it time consuming, so many different factors affect the outcome, and there are many decisions that must be made, up front, and as the work goes along. The carving is complex, and you can easily lose sight of the goal, in a heap of wood chips and crude toolmarks. By using a «formula» rather than a «sketch» or a design, finding back to the right path again is easy. Fixed points that will stay unchanged throughout the process, give guidance all the way. These statues have a flat backside, a ground zero, which sculptures in the round lack. Through experimenting and work with copying 13th century sculptures you get an insight in to how they probably were created back then. You discover what was plane routine and what was more challenging. How they, – as we do now-, economized the work effort, and when it was of utmost importance that shapes or surfaces were as thoroughly worked out as possible. The study shows how the creative process is affected by the fact that the wood is going from fresh green to ready seasoned, as the work proceeds, and the artisan has to play along and let the mechanics and the anatomy of the wood lead on.
From the theological and liturgical ideas, the oak tree still standing in the wood, and the ultramarine embedded in the mountains of Afghanistan, to the statues ready for religious use in the churches, there are so much to learn.
All processes leave traces and marks, clues which might tell important stories, but without knowing the processes, they can easily be overlooked. I will not draw any conclusions, stating I know how these works were executed in the 13th century, but working with the material practically over many years, have at least given me a better foundation for reading and interpreting such works of art.

